Tuesday, March 30, 2010

groove slam. work it back. filter that. baby bump that track.

i did this after extreme pain and stinging in my right eye, as a result of too much rubbing with cotton pads and eye make-up remover :(

i'm thinking that i will need to switch to waterproof mascara for a while because it doesn't end up aaaaaaaaaaaall over your face after the shower and hence, reduces the need for me to attack my face to get all traces of it off!

my favourite waterproof mascara is maybelline full 'n' soft :)


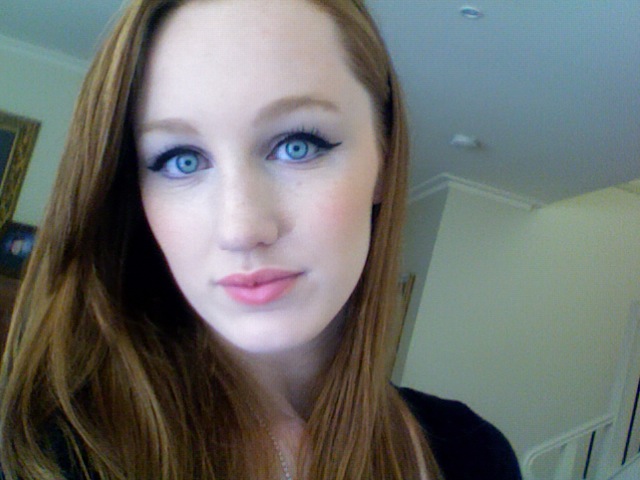
big, fat liquid eyeliner along the upper lashes - MAC Penultimate Eye Liner in Rapidblack.

the only liquid eyeliner i am actually capable of using! it's like a pen and has a relatively short brush tip.


to do this type of line, i start in the middle and work out with little strokes just to the end of the eye (don't make the wing yet), then work back from the middle into the inner corner.

this line is very thin at the inner corner then gets quite thick as it moves out.

to do the wing, i try to think of the imaginary line where lower eyeliner would be, and follow it out from the outer corner - this will make it look like a long, thin flick at the end - for this look, i then drew a line from the outer tip of the line to the centre/outer-third of my eyelid and filled it in - this is what makes it look like a flat line when the eye is closed.


SHADOW! because you know i can't live without it lol...

all over, everywhere (totally accurate description):
- MAC Gesso (matte white)
- MAC Naked Lunch (shimmery goldy pink)

only in crease (with bullet brush, then fluffy brush to blend):
- Urban Decay Mad Hatter (mid-dark brown)
- Urban Decay Vorpal (mid grey)
put one tap of each colour on the brush at the same time to blend. build gradually.

Extras:
- Dior Diorshow Blackout mascara on top lashes only
- MAC Brow Set in Beguile


- Becca loose shadow in Nymph with a fluffy brush in the inner corner (upper and lower) to brighten
- Chanel Crayon Kohl in Blanc (white) on lower inner rim to open up the eye

this is the first time i've ever done the 'no-mascara-on-lower-lashes' thing - i like it, but i think the look needs to be very top-heavy to support it, like heavy eye liner or bright/dark shadow on eyelid.

you can compare with my other looks and see if you can tell the difference - let me know what you think :)

i thought i would include the picture below to show you the wacky eighties cowlick that is pretty much the bane of my existence and the reason i always have bobby pins or braids pulling the front of my hair back!

hope you guys had a gorgeous weekend!

my weekend =
good old collingwood forever, we know how to play the game.
side by side we stick together to uphold the magpie's name.
see the barrackers are shouting, as all barrackers should,
for the premiership's a cakewalk for the good old collingwood!

have i inspired love ? loathing ?

Monday, March 22, 2010

LADY GAGA

so excited i could just about explode.  not joking.

quick post so you can see the tim burton mad hatter inspired make-up that beautiful John chose when given the choice between mad hatter or a red-and-black creation.

he's telling me to hurry up because we need to get dinner on the way, so i will come back later and tell you what i used - you can probably work it out by now because i use the same products all the time :P lol.


i did try to tease/backcomb/volumise my hair but as you can see, it was not interested... fail.

ahhhhhhhhhhhhhhhhhhhhhh lady gaga!!!!!

Friday, March 19, 2010

urban decay alice in wonderland book of shadows

a good picture of the Urban Decay palette that i use a lot - so you can see what the colours look like rather than me just giving you their random names!


these are renamed Urban Decay eyeshadows - here is a list of the original names in case you want to hunt one down :)

Underland = Flash

Alice = Painkiller

Oraculum = Baked

Queen = Last Call

Chessur = Chopper

White Rabbit = Polyester Bride

Wonderland = Maui Wowie

Curiouser = Grifter

Muchness = X

Mushroom = Mushroom

Midnight Tea Party = Midnight Cowboy Rides Again

Vorpal = S&M

Absolem = Homegrown

Drink Me, Eat Me = Sin

Mad Hatter = Twice Baked

Jabberwocky = Oil Slick

haircut + colourful eyes

haircut by Chris at PREEN (267 Collins St., Melbourne - literally nextdoor to Tiffany & Co. = very convenient if you happen to arrive a bit early for your appointment and need to kill some time/spend some moolah).

it's quite a bit shorter and he's magically managed to give it some volume and wave - props to him because my hair refuses to maintain any shape or fullness!


alright, on to my wacky eyes for work today - not very CR... but everyone still liked them!

products involved (around a thousand, as usual):

Whole eye area (preparation):
- MAC PaintPot in Painterly
- Urban Decay eye shadow in White Rabbit (Peroxide Bride - glittery white)

Eyelid stripes:
- MAC eye shadow in Aquadisiac ('deep sea turquoise')
- MAC eye shadow in Nylon ('pale gold with icy metallic shimmer')
- MAC eye shadow in Beautiful Iris ('fresh lavender with sheen')
- Urban Decay eye shadow in Underland (Flash - bright purple)

Eyelid Eyeliner:
- Urban Decay 24/7 Glide-On Eye Pencil in Zero (black) + lower rim
- Urban Decay 24/7 Glide-On Eye Pencil in Flipside (dark turquoise)

Below lower lashes:
- Urban Decay eye shadow in Vorpal (S&M - metallic grey)
- Urban Decay eye shadow in Midnight Tea Party (Midnight Cowboy Rides Again)

Eyebrows:
- MAC Brow Set in Beguile

Eyelashes:
- Dior Diorshow Blackout Mascara in Black

Cheeks:
- MAC Bronzer in Golden
- MAC Mineralise Skinfinish in By Candlelight

Lips:
Rimmel 1000 Kisses Stay On Lip Liner Pencil in 014 Wild Clover
- Napoleon Decade Limited Edition Satin Lips in Christiana

trying out a new format for explanations, mainly because i always feel like i make the explanations too long but also because i'm a little bit sleepy after working til nine!

let me know what you prefer :)

silence in black and white


this is a quick black and white look that can be made into whatever shape suits you - i have drawn my shading out to a point at the end of my eyebrow, but you can easily make it more round or not as deep as i have.

- begin with foundation plus either primer or concealer and powder on your eyelids

- line above your upper eyelashes with white eyeliner (mine is Chanel)

- cover your whole eyelid, up to the eyebrow and into the corner of your eye, with white shadow (Urban Decay Peroxide Bride/White Rabbit)

- line your inner lower rim with black kohl pencil (MAC Smolder), drawing it out a little past the end of your eye - to give you a guide for your contouring

- smudge a metallic grey into the crease of your eyelid and up onto the brow bone - shading it out into a point toward the end of your eyebrow if you want the shape like mine, or shading in a round shape toward the end of your eyebrow if you want it more round (Urban Decay Vorpal and MAC Electra) - use both your bullet brush, and a fluffy brush to soften the edges

- using an angle brush use black shadow over the extension of your eyeliner, then in a line back through your eyelid crease (MAC Carbon)

- without adding any shadow to your bullet brush, blend the black line into the crease to make it a bit fuzzy, then add some black shadow to thicken the line and make it heavier - go over with a fluffy blending brush if it's still too stark a line

- using the fluffy brush, blend your white shadow into the area between the grey shadow and your eyebrow, down into the corner of your eyelid and just under the inner corner of your eye

- redo the black liner under your eye, and add some white shadow to the very centre of your eyelid to keep it highlighted

- mascara and eyebrows :)

- my lipstick is the brrrrrrrrrrrrrrrrrrand new MAC Viva Glam Gaga, which the MAC website describes as 'light blue pink' - i bought it because i love Lady Gaga, not because it's a particularly good colour for me lol but i don't think it looks too bad here

LADY GAGA CONCERT NEXT TUESDAY NIGHT:
firstly, is anyone else going ?? secondly, how should i do my make-up for it ??

Saturday, March 13, 2010

'lavender eyes'

brand new products in this look (all MAC - surprise, surprise..):
- eye shadow in 'beautiful iris'
- eye shadow in 'nylon'
- limited edition mineralise skinfinish in 'by candlelight'
- brow set in 'beguile'


this photo best shows the shapes/organisation of this look. there's interesting placement of colours that i definitely wouldn't have thought of on my own - it's a look from Beautiful Eyes.

- i started with the Urban Decay eye primer potion, then MAC PaintPot in Painterly - this gives you a smooth, even and evenly-coloured surface, but don't stress if you don't have these products (they're possibly just random extras that cosmetic companies create to make you spend more money :P however, having said that, i think they make a difference lol)

- line above your top eyelashes, into the corner and one-third toward the outside of your eye with white eyeliner (Chanel Le Crayon Kohl in Blanc)

- cover eyelid, over brow bone, up to eyebrow with pale gold shadow (MAC Nylon) using the flat brush (applies the shadow more heavily than a fluffy brush)

- using the your bullet (or any small, soft-ish) brush apply light purple/lavender eyeshadow (MAC Beautiful Iris) from the inner corner of your eye up your eyebrow, keeping the centre of the lid gold - don't blend too far across

- same brush, same colour, all the way under your lower lashes

- line the inner rim with black, navy or dark violet eyeliner (i used Maybelline Line Express in Blackened Sapphire) and the outer third of your eyelid

- shade the outer triangle of your eyelid with a dark purple or black eyeshadow, blending out toward the end of your eyebrow - i used MAC Beauty Marked (blacky-purple with red-purple glitter), then Urban Decay's Underland from the Alice in Wonderland Book of Shadows (bright jewel purple) over the top to brighten it a little and emphasis the purple-ness of the look

- black, navy or brown mascara will work with this look - whatever is your preference (i used my usual)

- quick brush with the new MAC Brow Set in Beguile (so i look like a grown-up who can do make-up properly and understands the point of eyebrows lol) - its applicator is like a mascara brush, so it's beyond easy to apply :)

- cheeks are MAC Bronzer in Golden, then MAC Mineralise Skinfinish in By Candlelight - the skinfinish powder creates the most beautiful pinky-gold glow

i wanted this skinfinish colour because i had bought it in Year 12 (*cough* 2005 *cough*) and was so upset when it ran out... i missed the boat a bit when it was re-released recently and didn't take any notice of the display until this colour was all sold out! every MAC in Melbourne had sold out, but (lucky lucky) i wandered back into Myer Melbourne and the girls told me that someone had just returned a By Candlelight.

= excitement (and a big telling-off from my beautiful friend, Bliss, who had said "Come back in fifteen minutes and we'll get a coffee" for spending even more money at MAC than i already had that day)

Monday, March 8, 2010

'sexy eyes for redheads'

first and foremost, i did not make up that name for this eye shadow - it is one of the looks from the book i mentioned in an earlier post, Beautiful Eyes by Rae Morris.  it's pretty cool and not a traditional colour combination which makes it quite eye-catching.  plus it's easy-peasy - not as many steps as i usually have :)

  • Urban Decay Eye Shadow Primer Potion (from Urban Decay palette) over lid and up to brow.
  • load up your fluffy brush with a bright purple - i used Underland from the UD palette - cover your lid, into the crease and just under the brow bone, this gives you a 'wash', then go over with Underland using a flat brush to intensify, brighten and deepen the colour.
  • using your angle or bullet brush, put an orangy-gold in the inner corner of your eye - mine is Muchness from the UD palette - blend slightly into purple shadow on top and a short way under the lash line on the bottom.
  • line your upper and lower rims with black eyeliner, extending a little past the outer corner (this will guide your black shadow later), this will make your eyeballs look very white against the colours.
  • with your angle brush draw a tidy line of copper/mahogany shadow (MAC Coppering) underneath your lower lashes, blending with the Muchness.
  • put some black shadow (MAC Carbon, or i used Jabberwocky from the UD palette with is glittery black) on your bullet brush and shade a little triangle on the outer corner of your eyelid.
  • go back over the inner two-thirds of your lid with the purple to brighten it up again (flat brush), and re-do the Muchness if you need to (angle brush, then blend with bullet brush).
  • superfluous instruction: black mascara on upper and lower lashes :)


this will work with any hair colour and eye colour (despite the title)!

good luck and thank you for reading :)

p.s. MAC tally for this pay period (fortnight): five eyeshadows, one brow gel, one mineralise skinfinish powder, one lipstick, one paintpot, one fluidline = BANNED!

can't wait to show you though :P

alice in wonderland

this look - bright/dark in the corners, light in the centre, dark crease - is very noticeable, in a good way, and will make your eyes stand out beautifully and no one will be able to look away :)


FINALLY alice in wonderland is out!!!  yay :) the beautiful boyfriend was nice enough to escort me to see the movie in 3D at shoppingtown.  i loved it and i loved recognising all my eyeshadow palette names in the movie.

this eye look is fun fun fun... i love it :) mix up your colours to make your own version!

- cover your eyelid all the way up to your eyebrow with MAC Paint Pot in Painterly (or Soft Ochre if you are more tan and not so pinky-coloured as me lol).  this will make your eyeshadow stick forever, intensify and give the truest colour, and give you a smooth surface.

- go all over the paint pot with Urban Decay White Rabbit (glittery white, the real name is Peroxide Bride if you want to hit up ebay - it's a good bright base colour).

- heavily hit the inner third of your eyelid and the outer third of your eyelid with Alice (bright blue) using the bullet brush (MAC #219), leaving the middle third very highlighted with the White Rabbit - go over the white again if it needs to be brighter.

- line the lower rim with black eyeliner (you know which one i use, any black is good though), extend a little past the end of your eye.

- again using the bullet brush, take Vorpal (slate, shimmery grey shadow) and run all the way along the black eyeliner under your lashes.

- still with the bullet brush, use Underland (bright purple) from the end of the eyeliner back two-thirds of the way along your eyelid crease - this makes your eye sockets look deeper and makes the shadow on the lid look lighter and brighter.

- highlight the centre of the eyelid once more if you need it with White Rabbit.

- as usual, lots and lots of black mascara :)


PLUS my new favourite: BUTTERFLY BALL - SHIMMER TREATMENT LIPSTICK in Trance

loooooooooooooove it!! gives you a red colour that you don't have to apply with a mirror! the Butterfly Ball lipsticks have blue shimmer which makes your teeth look whiter - winner always.

let me know how you goooooooooooooooo...

Sunday, March 7, 2010

diva eyes advanced class (+ the rule of thirds)

ok short and sweet post - this eye is exactly the same as the previous 'diva eye' look BUT i have added a black shadow in the crease of my eyelid... somehow though, in the photos where the crease is in real life looks really low.. boo!

i went to doncaster shoppingtown to see poppy king and have my lips done - anybody who doesn't know who she is, FIND OUT!  beautiful new range called 'Lipstick Queen' stocked in Kit - http://lipstickqueen.com.  mum bought a lip liner and a lipstick and i got a lipstick... i will show you in the next post :)

all of the make-up artists there, and Poppy, commented on this eye shadow explosion, so get involved!


these photos aren't really very helpful, but this method actually looks amazing in real life. once again, with any eye look, not just this one :)

- once you've done your eyelid shadow, line your lower rim with MAC Eye Kohl in Smolder (or any black eyeliner you have), and the outer third above your top lashes (note: only one third! if you go halfway you chop your eye in half and it looks unbalanced, so either do one third or two thirds - always!)

- extend the lower eyeliner using MAC Beauty Marked (purpley, sparkly, blacky colour) and an angle brush, making the top eyeliner meet it

- make or break part - draw a line with your angle brush with the dark shadow from the end of the line back to two thirds of your eyelid (again, not all the way)

- smudge smudge smudge with your bullet brush (MAC #219) until it's blended nicely

- then if you don't want it to be such an obvious line, add a little shadow to fill in the outer triangle, like i did - in one third of the way to the inner corner of your eye

wells.. obviously i'm not capable of 'short and sweet', so my apologies for misleading you.

have fun trying this and let me know how you go!

Wednesday, March 3, 2010

yes, i know it's too hot to be wearing a hoodie and leggings, but i will get suburnt if i wear a sundress.

on a day where regular people would be going to the ocean, i decided to try kandee's "Ocean Eyes" - kandeethemakeupartist.blogspot.com - PLEASE watch her videos, i love her and she is amazing :)

once again, i managed to blend out the brightness of the colour that i used :( i think this is because i don't pack enough colour on when i apply it at the start.  i really was not happy with this look in the process of doing it, but once the mascara went on, it was ok :)

there is an incredible amount of glitter and sparkle in urban decay eyeshadow - the ones i used are in the Alice In Wonderland Book of Shadows (all the colours are renamed regular Urban Decay shadows) - i ended up with a heap of glitter all over my face because all the shadows i used were from this palette.  for this reason, i am glad that for the first time ever i applied my eye make-up before my foundation, so i could clean it up!


  • apply Alice (bright mid blue) mixed with Absolem (bright mid green) with a flat brush to the eyelid, into a rough corner aimed at the end of the eyebrow
  • blend that with Absolem on its own up over the brow-bone, to just under the eyebrow, pulling the colour out to the end of the eyebrow
  • blend the top line up to the eyebrow with Midnight Tea Party (sparkly gold)
  • using a wet angle brush, draw line the top lashes with Mushroom (dark taupe)
  • using your bullet brush, smudge Mushroom mixed with Vorpal (slate mid grey) under the lower lashes, all the way across
  • i used the Urban Decay 24/7 Glide-On eye pencil in Zero (black) to line my lower rim
  • lots of black Diorshow Blackout!
  • cheeks are MAC bronzer in Golden (always!) along/under cheekbones and Chanel Irreelle Blush in Pink Cloud in rough circles on the 'apples' (i hate fruit, so that's very hard for me to say - hence the inverted commas)
  • lips are an old Maybelline goldy-pink with MAC Lady Danger (bright red) to sharpen up the edges, particularly the top bow

i get told to colour-in my eyebrows all the time, so i thought i'd try it, just so we could see the difference.  i used MAC Coppering eye shadow and my bullet brush, so it's a really quick, not-precise method.

i think i look like a clown with my eyebrows coloured-in, so i couldn't help myself with this expression - does anybody remember The Rock from WWE ?  i am a bit of a wrestling nerd because of my boyfriend.

can you smell what The Rock is cooking ?